Table of Contents
Creating an Invoice Manually - Legacy
If your provider account is not set up for EDI invoicing you will need to enter invoices manually.
See Invoice Overview - Legacy for more information on invoices.
Create the Base Invoice
- Go to Acquisitions ⇒ Create Invoice
- Fill in the fields in the invoice Details section of the invoice.
Add Line Items to the Invoice
There are three options for adding line items to an invoice. These options can be used in combination with each other.
Option 1 – Using the Search Tab in the Invoice
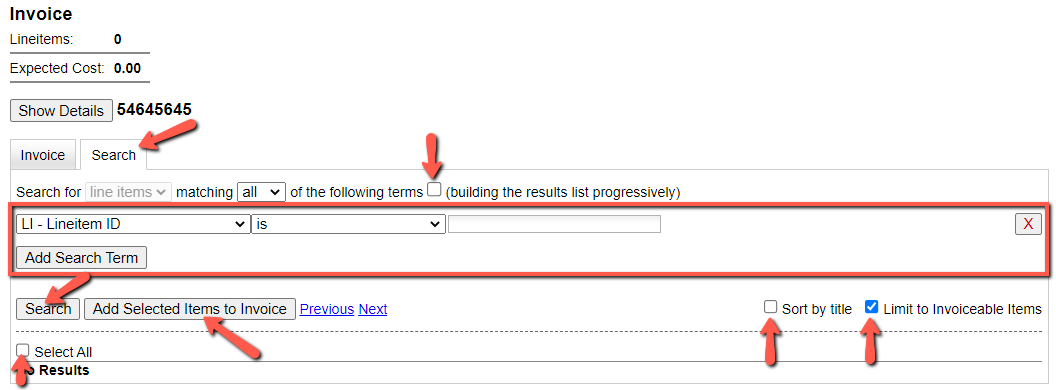
- Click on the Search tab in the invoice.
- Check off the building the results progressively option. When checked, each line item retrieved will remain in the search results list. This option allows you to pull all your line items into the result window, select them all, and add them to the invoice in a batch. When this option is not checked, each successive line item searched replaces the previous one in the search results so you would have to add your line items to the invoice one at a time.
- Select your search criteria from the drop down menus.
- The Limit to Invoiceable Items check box is checked by default. Invoiceable items are those that are on order, have not been cancelled, and have not yet been invoiced.
If you don’t find what you are looking for, try your search with this option unchecked.
- The Sort by title check box is optional. By default, results are listed by line number. This check box sorts the results by ascending title.
- Once you have configured your search, click Search or press Enter on your keyboard.
- Search will start a new search while Enter will build on your current search.
- Use the Next and Back links to navigate through the results.
- Select the line items you would like to add to the invoice and click Add Selected Items to Invoice.
- You can use the Select All check box to select all the results.
- The selected line items are highlighted, and the invoice summary at the top of the screen updates.
- Click the Invoice tab to see the updated invoice.
Option 2 – Link Line Items to an Existing Invoice from the Purchase Order
- Retrieve the purchase order.
- Check the boxes beside the line items you would like to link to your invoice.
- From the PO Actions menu, select Actions ⇒ Link Selected Line Items to Invoice.
- In the pop up box that appears, enter the invoice number of the invoice you would like to link the line item to.
- Enter the code for the provider. This field will auto-complete.
- Click Link.
- The Invoice # and Provider fields are sticky. The information entered in those fields will persist as you move between purchase orders until you change the information.
- The invoice will open in the same tab with the selected line items attached.
- Click Save.
Option 3 – Link an Entire Purchase Order to an Existing Invoice
- Retrieve the purchase order.
- Click Link Invoice.
- In the drop down that appears, enter the invoice number of the invoice you would like to link the purchase order to.
- Start typing the code for the provider. The field will auto-complete.
- Click Link.
- The invoice will open in the same tab and all the line items on the purchase order will be added to the invoice.
- Click the Detach link at the end of any line item to remove any that are not on the paper invoice.
Option 4 – Create an Invoice From a Purchase Order
- Retrieve the purchase order.
- Click on the Create Invoice button in the header of the purchase order. An invoice appear with all the line items that were in the purchase order.
- Fill in the required fields in the top of the invoice.
- Click the Detach link at the end of any line item to remove any that are not on the paper invoice.
Fill in the item (copy) and cost fields
For each line item, fill in the number of items (copies) being invoiced in the # Invoiced and # Paid fields. The two numbers should be the same.
Fill in the billed amount and either hit Tab. The Per Copy and Paid amounts will fill in automatically. The Billed and Paid amounts should be the same.
Add any necessary Direct Charges to the invoice
See Direct Charges for more information.
Close the invoice
Click Close to close and finalize the invoice.
Click Save to save your work if you need to come back to the invoice later to finish it.


