Table of Contents
Invoice Overview
Invoices expend funds encumbered by a line item or Blanket Order direct charge on a purchase order. You can also expend funds directly on an invoice using a Direct Charge.
Buttons from Left to Right
- New Invoice - Creates a new invoice
- Close Invoice - Closes the invoice
- Save - Saves the invoice but does not close it
- Up-Down Arrows - Open/Close the invoice header
Invoice Header
Red highlighted fields are required.
- Vendor Invoice ID - Enter the invoice number on the paper invoice.
- Provider - This is a type ahead box. Start typing the provider name and select the provider from the list.
- Shipper - If you have filled in the Provider box, the shipper will fill in automatically when you click in the box.
- Receive Method - Select the method (Paper or EDI, from the dropdown.
- Receiver - Defaults to the workstation location. You can select a different location if necessary.
- Invoice Type - Free text field.
- Payment Method - Select EDI or Paper from the dropdown.
- Payment Auth - Free text field.
- Note - Free text field.
- Invoice Date - The date defaults to the current date. Enter the invoice date from the paper invoice or select it from the calendar widget.
- Closed Date - Displays the date the invoice was closed. If the invoice is open the field is blank.
- Closed By - Displays the user that closed the invoice with a link to the users account. If the invoice is open the field is blank.
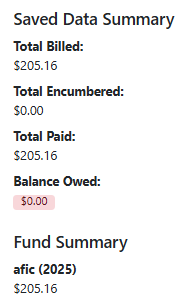
Saved Data Summary and Fund Summary
- Saved Data Summary - Displays the total billed, total encumbered, total paid and balance owed.
- Fund Summary - Displays the funds that are in use in the invoice.
Currently the invoice needs to be closed for the funds to display.
Tabs
Invoice Functions Are Accessed From Tabs
In an open invoice all tabs are active.
In a closed invoice only the Invoice Line Items and Print Preview tabs are active.
Invoice Line Items Tab
Lists the line items and charges included in the invoice.
Line Item Amounts
The #Invoiced, #Paid, Billed, and Paid amounts need to be filled in to match your paper invoice. In an EDI invoice these amounts would already be filled in and you just need to verify that they match the paper invoice.
Detaching a Line Item
1. Click the Detach button next to the Paid field in the line item you want to detach.
2. A dotted black border will appear around the line item amounts along with a Reattach button. Clicking the Reattach button restores the line item.
3. Click Save and the line items you detached will be removed from the invoice.
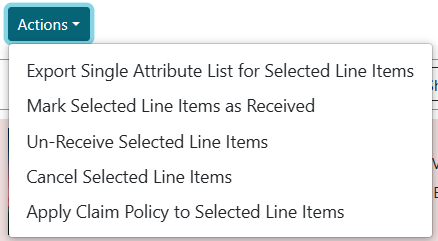
Actions Dropdown
The actions in the dropdown become active when line items are selected.
Actions include:
- Export Single Attribute List for Selected Line Items - allows you to download ISBNs, ISSNs, or UPCs for selected line items.
- Mark Selected Line Items as Received - Select the line items you want to receive and then choose this option from the Actions menu.
- Un-Receive Selected Line Items - Select the line items you want to un-receive and then choose this option from the Actions menu.
- Cancel Selected Line Items - Select the line items you want to cancel and then choose this option from the Actions menu. You will then be prompted to choose a Cancel Reason.
- Apply Claim Policy to Selected Line Items (Claiming is not currently used by NOBLE)
Line Item Selection, Filtering, and Sorting
Line Item Selection functions the same as in a purchase order.
Line Item and Filter Sort Options are the same as in a purchase order.
See more information about the line item section in Purchase Order Overview and Line Item Overview
Direct Charges, Taxes, Fees, etc.
See more information in Direct Charges
Batch Receive Tab
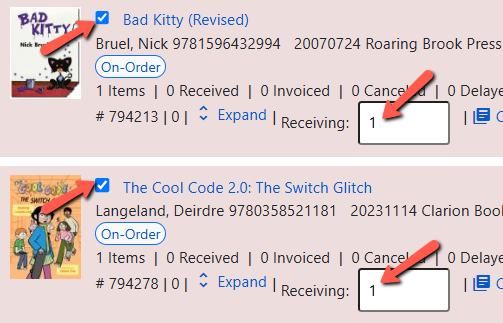
To receive items:
1. Click on the Batch Receive tab in the invoice.
2. Select the line items you are receiving.
3. Enter the number of items you are receiving in the Receiving box for each line item.
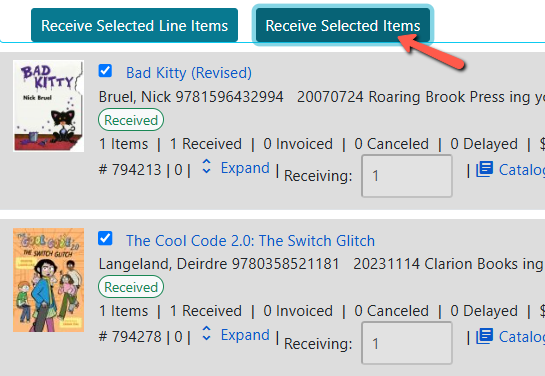
4. Click the Receive Selected Items button.
5. The received line items will turn grey.
Search Tab
Here you can search by ISBN, line item ID, and other fields to retrieve a line item and pull it into an invoice.
Set As Default Line Item Search - You can set up a search and save is as your default by clicking this button. In the image above a default search has been set up for searching by ISBN.
Reset Default Search - Resets the search to system defaults.
Keep Results between searches - so that you can build a list of line items you have searched, select them all, and then add them to the invoice all at once.
Retrieve Results Immediately - 
Limit to Invoiceable Items - 
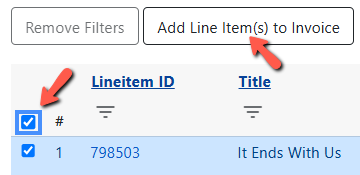
Adding Line Items to an Invoice
1. Search for the line items you want to add.
2. Check off the line items to select them. 
3. Click on the Add Line Item(s) to Invoice button.
4. Click back on the Invoice Line Items tab if you are finished adding line items.


